Saturday, September 27, 2008

Presenting the Copper Queen

This is the front view on the "Art Doll" from a 12" mannequin I got from Outside the Margins...Aileen is sponsoring a contest over there and I thought I would try it out. I have never made a "mannequin art doll" before.I needed something around the neck so I used a silk flower, I took the flower apart and painted it with the Copper Lumiere, when the petals were dry I cut the sections in half and glued them around the neck like a collar. After I attached the sleeves I layered the flower petals and feathers (3 layers) you know petals, feathers,petals, feathers, petals, feathers...I embellished the sleeves with some more flower petals (the smaller center petals)and some copper beads and some more feathers (did I mention I love feathers?) 
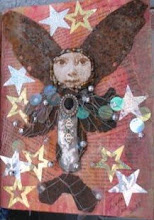
The dress skirt is the only sewing that I did on the doll...that was just to gather the fabric to fit around the waist. (Hand sewn not machine) The skirt is two layers, the under layer is full length and the top layer is shorter with feathers glued to the hem. I used some of the copper ribbon (like on the head dress) to make a "belt" then I curled the ribbon around a pencil..this ribbon is pre wired so it stays in the curls.
This is a back view of the doll and you can see the feathers that go all the way around the upper skirt. The wings are made from a feather butterfly that I had and I just painted it with the same copper paint and added some copper glitter on the wing tips.
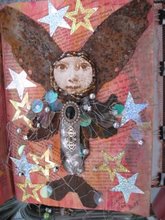
This is a close up of the "breast plate" it is made with some vintage jewelry pieces that I put together with some beads and a dragonfly charm...I hot glued it to the upper front of the dress. The Copper Queen also has a scepter made from a wooden bar-b-que skewer wrapped with the copper ribbon. I added some fibers and beads. There is a little bird on the top of the scepter...It was yellow but I painted it copper and added some feathers to match the dress.

I really enjoyed making this doll and I like the way it turned out...I am off now to create her "sister" the the "Golden Warrior Princess"...I may have to make them a step-sister, the "Silver Ice Princess". Looks like I might have to order some more mannequins from Outside the Margins. You know sometimes your muse just goes off on a trip and luckily you get to ride along...lol.

The beginning of the Copper Queen

The process of making the mannequin into an "Art Doll" has begun, this is where I was about noon yesterday...I made the face out of Fimo Clay using a pop out mold, the copper paint is #564 Super Copper by Lumiere (I just love this paint) I painted the entire mannequin and the face. I then glued the face on with E6000.

The hair is made of copper colored tassels from some trim I got 75% off (of course) at Hancocks...I found an old "bone" bead in my stash and painted it copper, and glued it to the top of the head...I used some copper ribbon I got at Michaels ($1 bin of course...what else would you expect from the "Bargain Queen") I folded the ribbon and hot glued it to the copper paint bead.

There was a nice big hole in the bead so I squirted in some hot glue and added the feathers and the tear drop shaped stone (up side down) I got this glass tear drop from a hanging sun catcher that my brother gave me a year or so ago...he is always bringing me great "stuff", just because he is a cool and awesome brother.

I then glued some feathers behind the head, I wanted them to accent the head, you know like a big stand up collar, don't all Queens have those big stand up collars???? I got some copper "sparkellye" fabric at Hancocks. (they had all of their Halloween Costume fabric on sale 50% off). I cut a strip of the fabric and wrapped it around the upper torso.

Wednesday, September 24, 2008

Standing in line for new clothes! Pick me, pick me!

These mannequins came to my studio this week, from Outside The Margins, they are getting measured for some new out fits (they believe that they can become Art Dolls). I am sure they were dancing around this morning in the studio, but they just "froze" when I walked in. A few of them tried to get my attention by raising their hands. These 3 are just jealous because "The Copper Queen" has already gotten her paint and is sporting part of the pattern for her costume. I hope you check back soon to see what kind of trouble these future "Art Dolls" get into. There is a contest over on http://www.outsidethemargins.com/ to make an "art doll" using a 12" wooden mannequin (available for only $4). Aileen has some really great art products that I can't seem to find anywhere else. Her prices are excellent and her service is great. She doesn't know that I am giving her this "plug". I just like to share that I am a happy customer of hers and thought some of you might like to get in on this fun project.

Monday, September 22, 2008

Yipppeeee

I am really excited to say that I won the bid on Christy's Collage #B (see below). It is such a worthy cause and I was so pleased to be able to participate. Thanks Christy for all of your hard work...just wait until you have walked the bridge and then you will really have done the hard work...lol....I see a foot massage in Christy's near future.

Wednesday, September 17, 2008

Christy's Collage Auction for Alzhiemers Research

These 3 collages were made by my friend, partner and awesome artist Christy. Christy's mother-in-law has Alzheimer's and there is a "Memory Walk 2008" campaign in Fort Meyers, Florida to raise money for Alzheimer's Research...so Christy has created these 3 collages that are being auctioned off over on her blog... http://averageamericangirl.com/ If you could take a few minutes out of your busy schedule sometime this week to check it out that would be great...all of the info is on Christy's blog. Collage C
Collage B
Collage A

Go check it out.... http://averageamericangirl.com

Sunday, September 14, 2008

Experiments with Watercolor & Acrylics

I tried some experimental background techniques using watercolor paper...I wet the paper and then I used sponges to apply different colors of acrylic paint. Starting with the lightest (yellow) color, layering on med colors (orange & turquoise) and then the darkest color (purple). As the paper and the paint dried it became more intense...then I used a smaller sponge and applied more purple.

I had carved some geometric stamps on linoleum blocks, I stamped the background with these stamps using black (permanent) ink...then I applied orange and turquoise dimensional paint to accentuate the design of the stamp.
This is another lino carved stamp that I carved (inspired by Sherrill Kahn). I stamped it in black and use the same process of embellishing the design using dimensional paint.
This a free hand "Angel" drawn with dimensional paint...these paints are really made for writing on fabric (like T-shirts)....I like the small pointed tip, because you can get some great detail with it....the other stamps are mine...and embellished with the dimensional paint also.


After the purple sponge printing..I used some watercolor daubers to make poka dots...the part I really liked about this section is the white of the paper showing through the paint...just like in a watercolor painting the white of the paper gives a "sparkle" to everything.
I think these will make a great start for a collage. I could add some layers of paper and dry brush gesso, then some images and 3-D stuff...that might be cool..I think the possibilities are endless now that I have the backgrounds done...
These backgrounds were done on some 100% cotton fabric that I had washed and dried in the dryer...it came out all "crinklie" and I kinda liked that...I wet the fabric (just like the watercolor paper) and spread it out on my work surface...then I applied acrylics and watercolor to the fabric just like I did to the paper...the color seemed to be a little more intense than on the paper...but that could have been because the fabric was not as wet as the paper...after all this was just an experiment...lol.


I cut off a piece of the paper with the intentions of embossing...but the paper was too thick to emboss...so I just stenciled the embossing design using my gel pens...you can't tell in the pics but there is a lot of glistening parts because some of the gel pens were metallic.


Some more sections of the fabric background...
After the fabric dried...I ironed the back side...to heat set the paint.
This is a close up of the middle of a doll that I free handed on a section of the pre-painted fabric...another idea from Sherrill Kahn...After I drew the doll on the fabric I embellished it with dimensional paint and stamps.


This is a close up of the top of the doll...I applied beads to the design (which is not finished...I always forget to photograph my work in progress)
This is a view of the entire doll...the face will be made from polymer clay...I really love the colors of the back ground fabric...once I have finished the embellishments, I will stuff the doll and take some more pics (she is 22" tall)...You know I always like to include the size of my projects, because it is really hard to tell how big or small something is in pics. Check back soon for the finished product.


Wednesday, September 3, 2008

More Inspiring Women Spreads

These are the tags for the pockets in one of the Georgia O'Keeffe spreads for my Inspiring Women AB RR for our ICE Group. I had so many pictures of her and her art work that I decided to make some tags to display the pics...I just glazed the tags with some Golden Glazes and then used the same stamp on them that I used on the pages of the book. This is my 1st Georgia O'Keeffe spread...I glazed 4 pages and then folded the 2 middle pages down and glued them to make pockets for the tags...I stamped (just a little foam stamp that I like, not sure where I got it...one of my bargain stamps!) then I used some border stickers that I got at Big Lots (they always have great scrap booking bargains), then I used one of the quotes from Georgia O'Keeffe at the bottom right...just click on the pic and you can read it...
This is the 1st page of my AB for the RR...the back ground is Golden Glazes (3 colors.. warm, cool, warm) the yellow dollies are some I got in Santa Fe at a really cool place called "Jack-a-lope", they had all kinds of Mexican paper stuff, great beads and lots of other stuff to numerous to mention...Then I used a little swirly stamp and a portrait stamp by Stampabilities "Woman in Waiting" from Hobby Lobby (On sale of course.. lol..) The lettering is made from some foam alphabet stamps highlighted with markers...I got some new markers at Sam's the other day they are made by Bic and they are permanent ink...but they are pastel colors...been experimenting with them a little...nice colors. I added some colored rhinestones around the dollies...you know I just have to have a little "glitz". The fringe at the bottom is a little ribbon trim with sequins as the fringe...it was perfect for this page. I am working on my other spreads, should have mailed today...but my room mate Susan, fell at Band Practice and broke her wrist, yesterday so I am running a little behind. Awwwhhhaaahhh don't you just love Life 101?