I thought this was going to be the last in this series...but!...I have already started #6..so I guess there will be one more...
This is a close up section of #5...
 I thought this was going to be the last in this series...but!...I have already started #6..so I guess there will be one more...
This is a close up section of #5...
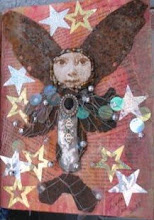
 This is the finished drawing and it has been completely inked. I have started the coloring process with Prisma Pencils.
 Not quite finished with the face but I was really excited to start the water coloring so I will go back and finish the face when I get the watercolor part done...this is the first in the series to have watercolor on it. These seem to be getting more and more detailed and complicated...not sure why but I guess it doesn't matter. You know I was thinking that I have always loved to color in coloring books...now I just draw and ink my own drawings and color them...hummmm?
 I really like the "bubbles" I got some new pan watercolors that have glitter in the paint, so I used it to color the bubbles...I don't think you can tell in the photograph...but it is really cool. I am wondering if the glitter will still show once the piece is matted and framed with glass...If you click on the pics you can see them really big and get a better idea of the detail. This piece is 28"x30" on Strathmore 180# watercolor paper.
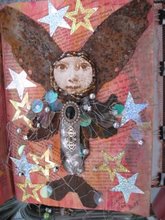
  This is a close up...so you can see the bubbles and the flowers.
  This is one of my pages...I used a "self portrait" of Vincent VanGogh which was only chest high and then using prisma pencils I complete the form, and added the brushes and the paint palette.
 This is my second page...It is an original watercolor of a "Clown".

 This is the cover....done by Ingrid Dykers...Ingrid did all of the binding and organizing of the book...There were 2 extra books made, just in case something happened to a book when they were returned. Some of the artists live in Germany, Australia and all over the US so we wanted to make sure everyone got a copy of the book.
  This is a pic of the book when it was finished. The whole process took us months and was very tedious because every page had to fit perfect for the book to come out right. It wasn't a matter of being able to trim or adjust the pages when it was time for Ingrid to put them together.
  Since we were lucky enough for nothing to have gone wrong and all of the artist received their own books, the extra books are going to be auctioned off over on Ingrid Dykers web site. So if you would like to see the rest of the book and join in the auction please just click on Ingrid Dykers above and it will take you to her web site.
 First I do the drawing...and I even remembered to leave a boarder this time...it makes it so much easier to mat and frame if the finished piece has a boarder of 1" to 1 1/2"...I usually just use the width of the yard stick which is a little over an inch...I started with a piece of Strathmore drawing paper that is 18"x24"...that seems to be the size that I find the most comfortable to work on...or maybe it is comfortable because that was the size I had handy when I started...lol..
 A little more drawing...
 Once the drawing is completed then I begin the inking process...I used an extra fine Sharpie permanent marker...this process takes almost as long as the drawing...because I seem to make it so complicated and have to really watch to not cross over any lines...unlike pencil there is no erasing errors at this point.
 Now comes my favorite part...the coloring...this is when I think about being a little girl again and coloring in the multitude of coloring books that I colored when I was young. I use Prisma Pencils,
 Some more coloring...I decided to make this a little risque...lol.


 There is a new drawing on my drawing table. I haven't been drawing enough lately, when I say drawing I mean that I haven't started a drawing that is intended to be a completed piece of art work...I draw all the time sketches, drawing in a journal or an embellishment in an altered book.
 This spread was made with Perfect Paper..then I added a large embellished butterfly on the left and a small metal butterfly on the right page (she really like butterflies) then I added some large sequin garland on the right hand edge. I used Golden Glaze for the color and added a sheet of cellophane that had silver stars(it came from a 1924 Central State University year book that I found in an antique store in Palestine, Texas...how cool is that?)
 This is the second spread that I did and it has Golden Gazes for the back ground color, then some foam triangles that I cut out with some scalloped scissors and wrote on with gel pens. Then I sewed some beaded garland that I got at World Bazaar in San Jose California, they were having an after Christmas 90% of sale...love it...then I added some beaded fringe at the bottom.
 This is the third and final spread for Christy's book...what I did here is I used some paper that I altered by using strips of an old magazine that I tore up and glued down to some water color paper, then I added strips of masking tape (3/4") and some glue dribbling for texture. After the glue was dry I did some washes of blue and yellow allowing them to blend in the middle, hence the green area, I stamped some swirlies on it and then just glued the page into the book. Then I added some alphabet beads to say "color" and "texture" and some little rhinestone embellished
 This one has a lot of beads and pages that I rolled up while they were wet and let dry. It could be hung on the wall or place on an easel for display. I gessoed the back of this one but I left a lot of the printed material in the catalog show through the glazes...The green pearlized leaves are some pins that are like corsage pins that I got from Lisa at Collage Stuff. I just pushed the pins into the back of some of the rolled up pages. There is a little frame that was made by cutting a small square in the paper before it was dry. There is a piece of lace that I put on diagonally to create a little more texture and then the beads are from a store called World Bazar in San Jose.
 I call this one "I See You" because I found some "googly eyes" that are funky colors and they just happened to match the colors I was using...funny how that happens some times....I probably had these things for 20 years and I just knew I would use them someday...well this was the day...lol. This is the catalog that had some blue & yellow Easter egg dye on it, so I built on those colors...well you know how much I love my Golden Glazes and the burgandy is my favorite so I add some of that...then I wiped it with a rag while it was still wet...then I used some permanent markers to do some doodle thingys. I have about 2 million buttons so I went through them and found 3 green ones and I sewed those on to the center. When I started to do the doodles I began to see triangles and so I followed the folds of the paper and accented those triangles with a purple marker. This idea of the Catalog Killing came from a UK artist by the name of Maggie Grey...if you google her you can find a lot more of her awesome work.
  Any way, there are more "unsolicited" cataloges being soaked, or dryed or squished as we speak, some other artists and I are going to do a collaboration using this media, it will be fun to see how different our styles will be when we finish....we will post the results some time at the end of the summer...hope you enjoyed clicking on these so you can see them bigger.
This is a video from my 50 year class reunion that was held last month in Fort Worth Texas. It is really cool...what great memories.


 What we have above is a big bag of buttons for .50 and below some really cool stuff including a gauge, a really old (old enough to be called antique, which is older than me...lol) light off of a Singer sewing machine, a metal flower, some wire, a grater and something that looks like an insulator but I am sure it is some kind of attachment for an electric juicer...OMG...how cool is that? That white thing with the gold brads is a bracelet...OK...the possibilities are endless here....what fun.

 This is a close up of the top left corner.
 This is the complete piece...I have added some fibers and wire coils...the clay faces are some I made using a push mold...I sewed the fibers to the bottom of the catalog across the bottom, then I coiled some wire and used my Japanese screw punch to make some holes for the wire to be attached without it showing from the front.
 This is a pic of the magazine (Real Simple) still in the bath tub...you can see the egg dye tablets.
 This is a catalog after I "squished" it
 This is another catalog after I threw it in a roasting pan...ONLY TIME WILL TELL!
 Ok..so this is really ugly...you have to wear a mask and scrape out the old dried pulp and seeds.
 This is a view of the inside of the lid...uggggllly! But just you wait and see how awesome it is when I scrape and sand and paint it...:)
 This is a close up of the design that I carved in to the gourd with a wood burning tool.
 The bottom after the carving of the design
 This is the design on the other side.